Configure the ARM in the Azure Portal
The following is relevant to both Azure AD authentication and Azure AD users. To add Azure AD to the ARM, first register the ARM as an application and provide the ARM with:
|
➢
|
To configure the ARM in the Azure Portal: |
|
1.
|
Register the ARM as an application; see instructions here. |
|
2.
|
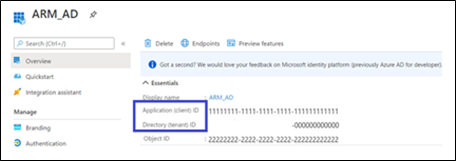
Retrieve the Client ID and the Tenant ID. |
|
3.
|
When registration finishes, provide the Client ID and Tenant ID displayed in the app registration's ‘Overview’ pane. |
Azure Portal
|
a.
|
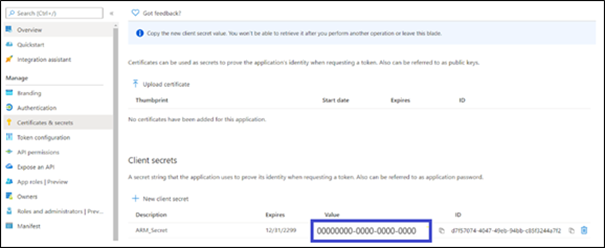
Create a client secret by clicking New client secret. |
|
b.
|
Copy the client secret value (not the ID) to a safe location; it becomes visible immediately after creation; only then can it be copied; later, it’s displayed with stars, e.g., hsjfhj******************k and cannot be copied. |
Client secret
[Relevant for Azure AD authentication and not for Azure AD users]
Enter the ARM Redirect URL to the registered application in the Azure portal.
In your Azure AD:
|
a.
|
Under Manage: Authentication, click add platform. |
|
c.
|
In ‘Redirect URIs’, enter the URL. |
Redirect URIs
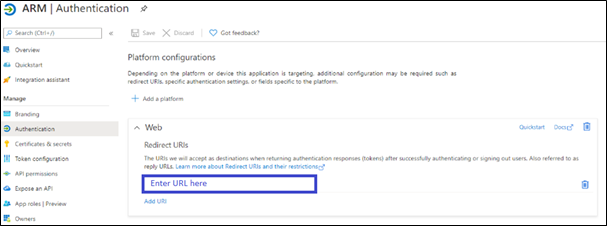
Make sure the format is https://{{IP address/Hostname}}/ARM/armui/login
The selected communication method (IP address or hostname) must match the ‘Communication method’ configured in the ARM (under Settings > Administration > Security tab).
For simplicity, copy the Redirect URL from the Settings > Administration > Azure Authentication tab.
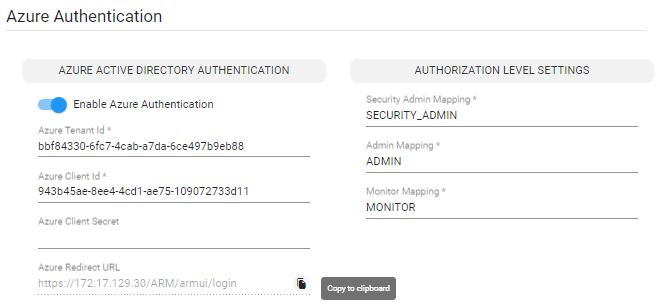
Any change made to the ‘Communication method’ setting (Settings > Administration > Security) is automatically reflected in the Azure Redirect URL link. Make sure that the same is configured in the Azure AD.
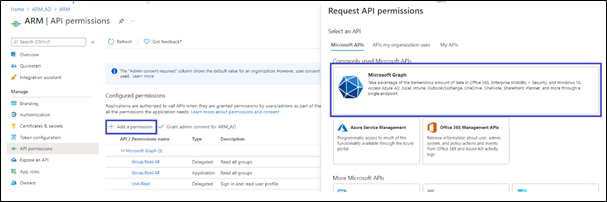
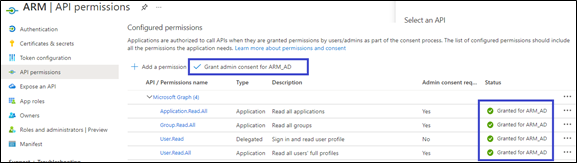
The ARM uses Microsoft’s Graph API v.1.0 to retrieve a user’s information and app roles. In your Azure AD, go to the API permissions tab and add the following permissions (of Microsoft Graph):
|
●
|
User.Read (Delegated) – allows the ARM to sign in on behalf of the user and read the user profile. |
|
●
|
Application.Read.All (Application) – allows the ARM to retrieve all app roles in the Azure AD for the purpose of testing connectivity. |
For AD users, operators must also add the following permission:
|
●
|
User.Read.All (Application) - allows the ARM to retrieve all the users and their properties from Azure AD. |
|
●
|
Group.Read.All (Application) – allows the ARM to retrieve the user’s membership groups. |
API Permissions
|
●
|
Click Grant admin consent to enable these permissions. |
Grant admin consent
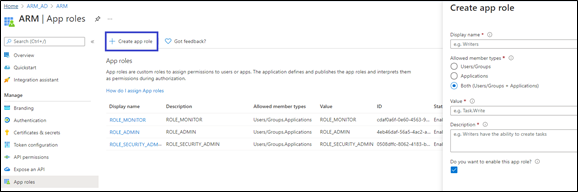
Create app roles that will be mapped to ARM access roles – Security Admin, Admin and Monitor. In Azure Active Directory, under Manage, select App registrations and select the application you defined in the first step.
Select App roles | Preview and then select Create app role.
In the Create app role pane, enter the settings for the role.
|
●
|
Allowed member types - Specifies whether this app role can be assigned to users, applications, or both. To support authentication via the REST API, both (Users/Groups + Applications) options should be selected, else select Users/Groups. AudioCodes recommends selecting the Both option which supports authentication of both the REST API and the GUI. |
|
●
|
Value - Specifies the value of the roles claim that the application should expect in the token. This value should match the roles mapping in Authorization level settings in the ARM. |
Authorization level settings
|
8.
|
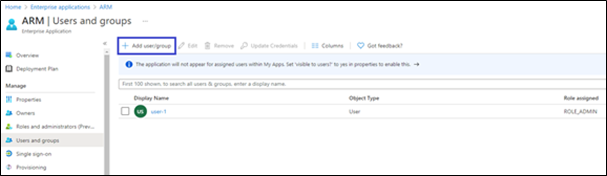
Assign users / groups to roles. |
After you add app roles in your application, you can assign users and groups to the roles.
|
a.
|
In Azure Active Directory under Manage, select Enterprise applications in the left-hand navigation menu. |
|
b.
|
Select All applications to view a list of all your applications and then select the application in which you want to assign users or a security group to roles. |
|
c.
|
Under Manage, select Users and groups. |
|
d.
|
Select Add user/group to open the Add Assignment pane. |
|
e.
|
Select the Users or groups selector from the Add Assignment pane; a list of users and security groups is displayed. |
|
f.
|
After you have selected users and groups, select the Select button to proceed. |
|
g.
|
Select Select a role in the Add assignment pane; all the roles you defined for the application are displayed. |
|
h.
|
Choose a role and select the Select button. |
|
i.
|
Select the Assign button to finish the assignment of users and groups to the app. |
Assign
|
●
|
If you’re using Azure B2C, adding app roles and assigning users / groups to roles is performed differently. |
|
●
|
Customers without Azure AD Premium cannot assign app roles to security groups. For these customers, app role assignment to users must be done individually by the administrator or an owner of the app. |
More information about the app roles configuration and assignment is available here.